Thematics
Exhaust Fans
Flow rate is much lower than expected?
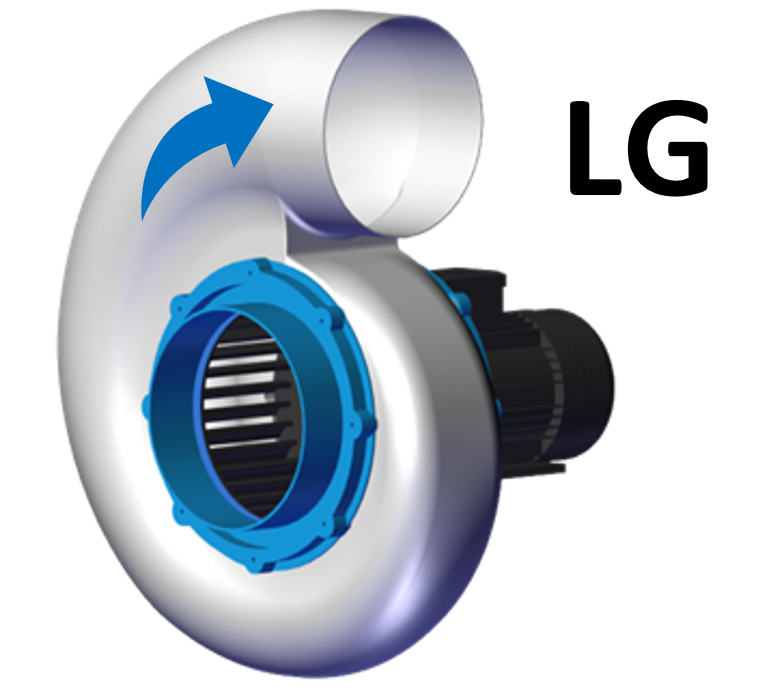
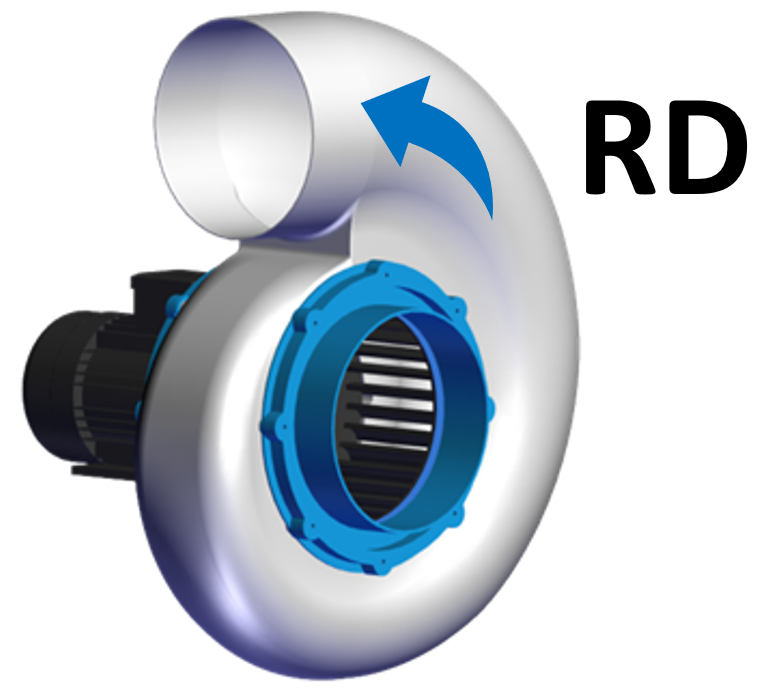
Check the direction of rotation of the motor, it must rotate in the direction of the arrow on the volute. When the motor rotates in the opposite direction, the air flow is in the right direction but with a very low flow rate.
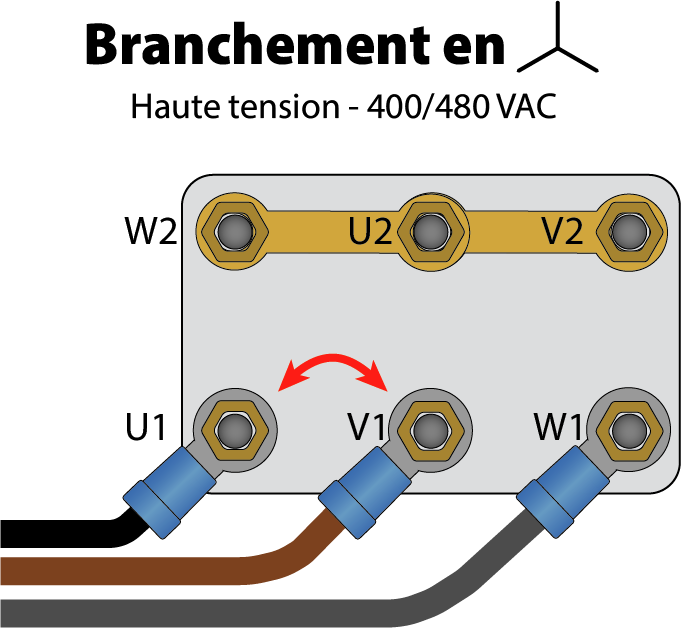
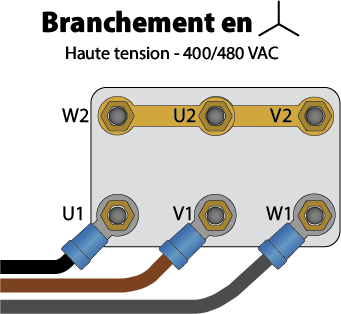
To reverse the direction of rotation of a three-phase asynchronous motor, simply reverse 2 wires on the motor connection:
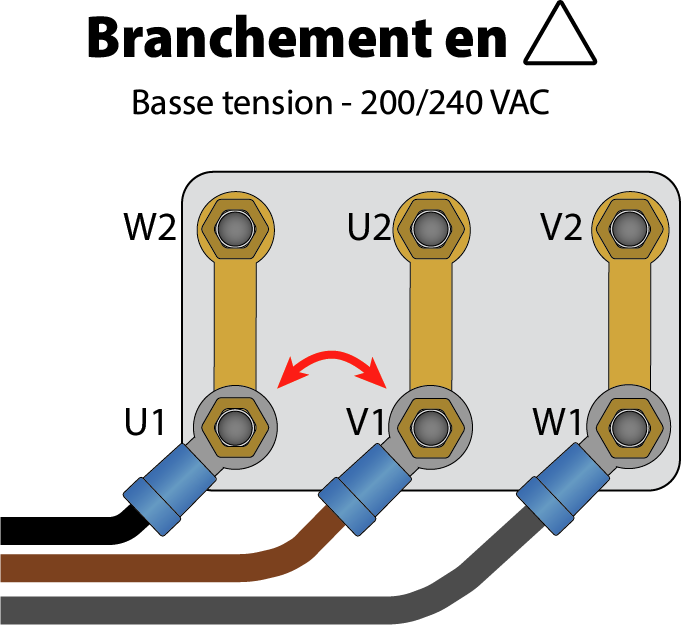
To reverse the direction of rotation of a single-phase asynchronous motor, the position of the copper plates and wires must be changed:
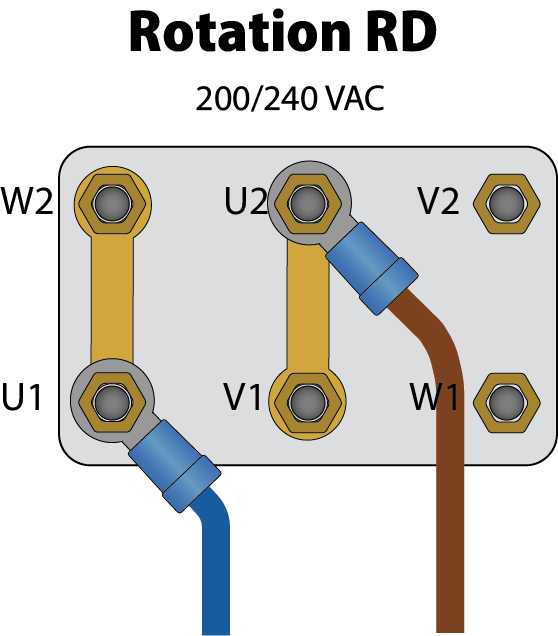
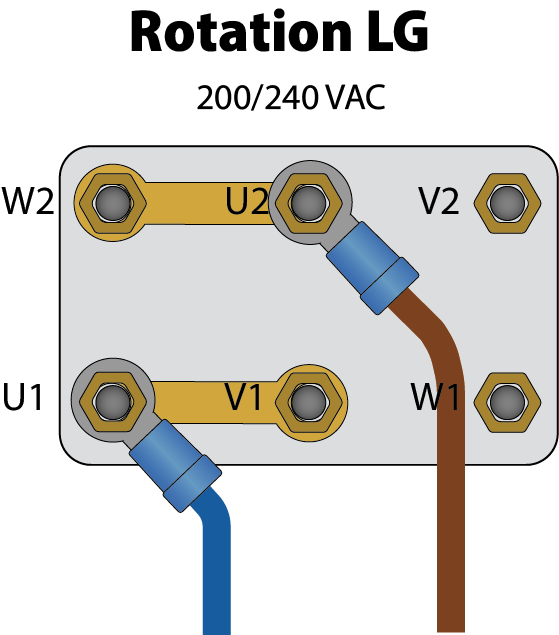
To reverse the direction of rotation of a single-phase EC motor, the direction selection input (brown wire) must be used:
- Connected to +12V => LG
- Not connected => RD
Is it possible to change the position of my fan from LG to RD or vice versa?
No, the impellers are different depending on the position (LG or RD), an inversion of impeller or volute will have a very strong impact on the flow rate obtained.
How to install the motor in an enclosed pedestal?
The motor must be installed inside the enclosed pedestal with the mounting brackets facing up.
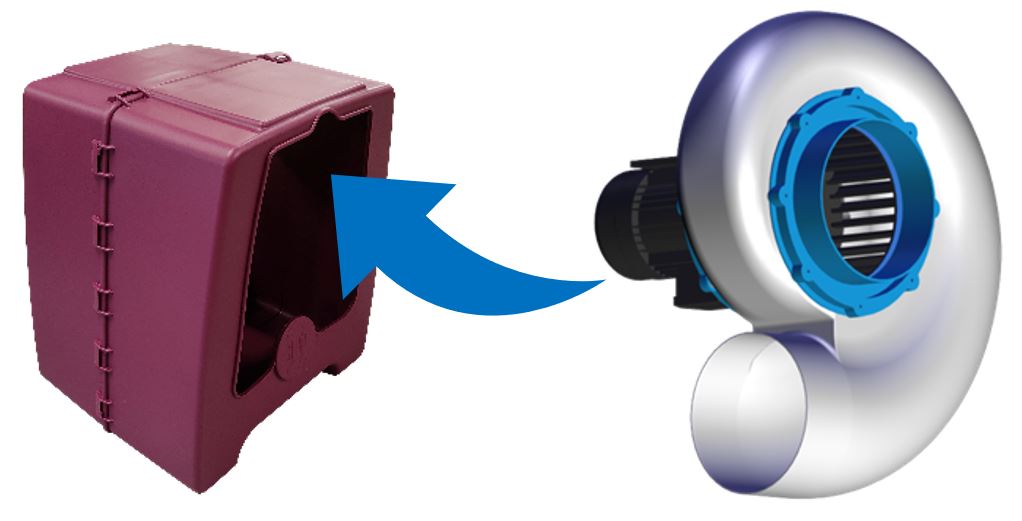
We adjust the orientation of the motor to the type of pedestal.
The SEAT50 fan does not reach its rated speed and trips the electrical protections?
Check the direction of rotation of the motor. This fan is only available in the LG position.
Is it possible to use a three-phase motor on a single-phase 230V installation?
Yes, it is necessary to use a VFD with a single phase 230V supply, this VFD will create three 230V phases generally connected in a delta configuration on the motor (refer to the fan installation manual).
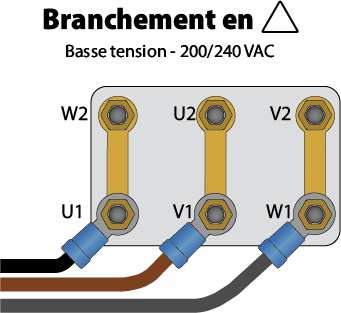
How to connect a three-phase asynchronous motor?
Consult the nameplate and find out about your electrical installation. If you are using a 230V frequency converter, you should generally use the delta connection and if you have a 400V three-phase supply or a 400V VFD, you should generally use the star connection.
| Wiring | Voltage |
|
Δ / Y |
230 / 400 |
The smaller of the two voltages corresponds to a delta circuit.
Caution! For 400/690 motors the delta connection must be used with 400V.
How to calculate the pressure drop in a ventilation system ?
Many parameters (diameter, type, equipment, filters, etc.) influence pressure drops, so do not hesitate to contact us to define the characteristics of your installation together. SEAT VENTILATION also provides training for you and your teams.
Is it necessary to include a purge?
The volute must not fill with liquid, if the position of the fan can allow rainwater to enter the fan, a drain must be provided and specified when ordering. Attention must also be paid to the condensation that may occur in the ductwork.
What is the operating temperature range of the fans?
The fans can be used between -15°C and +60°C.
What is the compatibility with chemicals?
The following is a non-exhaustive list of products compatible with SEAT fans at 20°C :
- Acetone
- Acetonitrile
- Acetic acid
- Acetic acid, glacial
- Boric acid
- Hydrobromic acid
- Hydrochloric acid 37%
- Hydrofluoric acid concentrate
- 100% Methanol
- 100% Ethanol
- 100% Isopropanol
- Alums
- Ammonia aq. 25%
- Chloroform
- H2O2 30% ETHYLENE DIAMINE
- Ethylene diamine
- Ethylene glycol
- Formaldehyde 37%
- Hydroquinone
- NaOH 10N
- Pyridine
The following is a non-exhaustive list of products NOT compatible with SEAT fans:
- Concentrated nitric acid
- Concentrated sulphuric acid 100%
- Bromine
- Diethyl ether
- Phenol
- Triclorethylene
Do not hesitate to consult us for any other product, the compatibility also depends on the temperature and the concentration of the product.
The fans are warranted against defects in material and workmanship for two years from the date of original shipment. Any unit or part found to be defective and reported within the warranty period will be replaced after a survey by SEAT VENTILATION, freight prepaid by the shipper. Wear and tear due to heat, abrasive action, chemicals, incorrect installation or use or lack of normal maintenance are not defects and are not covered by the warranty. Transportation to and from the factory for warranty repairs is not covered by the warranty and is the sole responsibility of the equipment owner.
The manufacturer will not be responsible for the cost of installation, removal, or reinstallation or for any consequential damages resulting from failure to meet the terms of any warranty
You can use our online selection tool ZEPHYR to help you choose your fan at: www.seat-selection.com
Dedicated controllers
No visual indicator (LEDs off)
Check that the power cable is correctly connected to the back of the board. To access the back of the board, simply unscrew the two screws.
The fan does not turn on when I press the fan on/off button
-
Check if the yellow LED lights up when you press the Ventilation On/Off button.
-
Check the electrical supply to the motor
- If you have a variable frequency drive, check its power supply and the connections of the on/off contacts.
- Check that the speed sensor is properly connected to the controller by accessing the back of the board.
- Turn off and then turn on the power to the controller.
The front speed of my fume hood is insufficient
- Check the direction of rotation of the motor. A SEAT fan running in the wrong direction will only draw 20% of its capacity. Reversing the volute (LG <->RD) has the same effect.
- Check that the fan is correctly sized for the installation.
- If a flow controller is used to control your fume hood, then redo the settings. The 0/10V signal sent to the controller is certainly too small.
The controller does not provide power, it provides a normally open contact. The light must still be connected to the power supply through the relay, in the same way as a switch.
The front speed of my fume hood is too high
- Check that the fan is correctly sized for the installation.
- If a flow controller is controlling your fume hood, then redo the settings. The 0/10V signal sent to the controller is probably too high.
You are in the test mode. Consult the user manual to exit this mode.
The green LED is on and the red LED is flashing
You are in the setting mode. Consult the user manual to exit this mode.
The alarm sounds repeatedly after a short period of time
- Make the alarm threshold settings again.
- The alarm delay may be too short. Two delays can be set using the switches on the back of the board: 15s and 30s. See the user's manual.
Air velocity/flow does not vary
Check with a voltmeter if the 0/10V output varies:
- If it changes, check the VFD connections
- If it does not change, check that the probe is correctly positioned on the fume hood and carry out the adjustment procedure again (see operating instructions)
The controller beeps 10 times when exiting the setting mode
- The set face speed is too low. Redo the settings using a higher speed.
- Check that the probe is correctly positioned on the fume hood and carry out the adjustment procedure again (see operating instructions)
Communicating controllers
No visual indicator (LEDs off)
- Check that the power cable is correctly connected (230V).
- Check that the HMI is correctly connected to the CPU.
The fan does not turn on when I press the fan On/Off button
- Check if the yellow LED lights up when you press the Ventilation On/Off button.
- Check the electrical supply to the motor
- If you have a variable frequency drive, check its power supply and the connections of the On/Off contacts.
- Check that the speed sensor is properly connected to the controller.
- Turn off and then turn on the power to the controller.
- Change probe connector (SONDE1/SONDE2)
The controller does not provide power, it provides a normally open contact. The light must still be connected to the power supply through the relay, in the same way as a switch.
Air speed / flow rate does not vary
Carry out the threshold settings (see operating instructions)
Check with a voltmeter if the 0/10V output (SA1 or SA2) varies:
- If it changes, check the VFD connections
- If it does not change, check the correct positioning of the probe on the fume hood, check the correct operation of the linear position sensor (PTLI mode, 2V EA1) or of the position switch (2V EC2 mode) and carry out the adjustment procedure again (see operating instructions)
The front speed of my fume hood is insufficient (Display LOW)
- Check the direction of rotation of the motor. A SEAT fan running in the wrong direction will only draw 20% of its capacity. Reversing the volute (LG <->RD) has the same effect.
- Check that the fan is correctly sized for the installation.
- If a flow controller is used to control your fume hood, then redo the settings. The 0/10V signal sent to the controller is certainly too small.
Indicates a guillotine overrun (window too high). This height can be modified in the threshold settings.
The front speed of my fume hood is too high
- Check that the fan is correctly sized for the installation.
- If a flow controller is controlling your fume hood, then redo the settings. The 0/10v signal sent to the controller is probably too large.
The alarm sounds repeatedly after a short period of time
- Make the alarm threshold settings again.
- The alarm delay may be too short. The alarm delay can be set in the BUZZER DELAY menu. See the operating instructions.
The displayed speed does not correspond to the frontal speed measured with the anemometer
In the setup menu, select the transposed speed display (Adjusd spd) and enter the speed read from the anemometer. Next, set the thresholds.
Ecoglass : automatically closing a moveable sash after detecting inactivity
Is ECOGLASS compatible with all installations?
Yes, its universal design allows adaptation to a wide variety of fume hoods, whether they are being manufactured or already installed.
How does ECOGLASS activity detection work?
It focuses only on the working area of the fume cupboard, thus avoiding untimely detections (passage of a fume cupboard laboratory assistant, for example) and guaranteeing optimal safety (stopping in the event of the sudden presence of an object on the fume cupboard). path of the window).
Are there any hidden costs associated with using ECOGLASS?
No, ECOGLASS, a system without mechanical energy input, is designed to be a reliable and durable solution, without frequent maintenance or replacement costs.